A Great Rack and a Great Bench Can Still Be a Bad Pair. Here’s What Actually Fits.
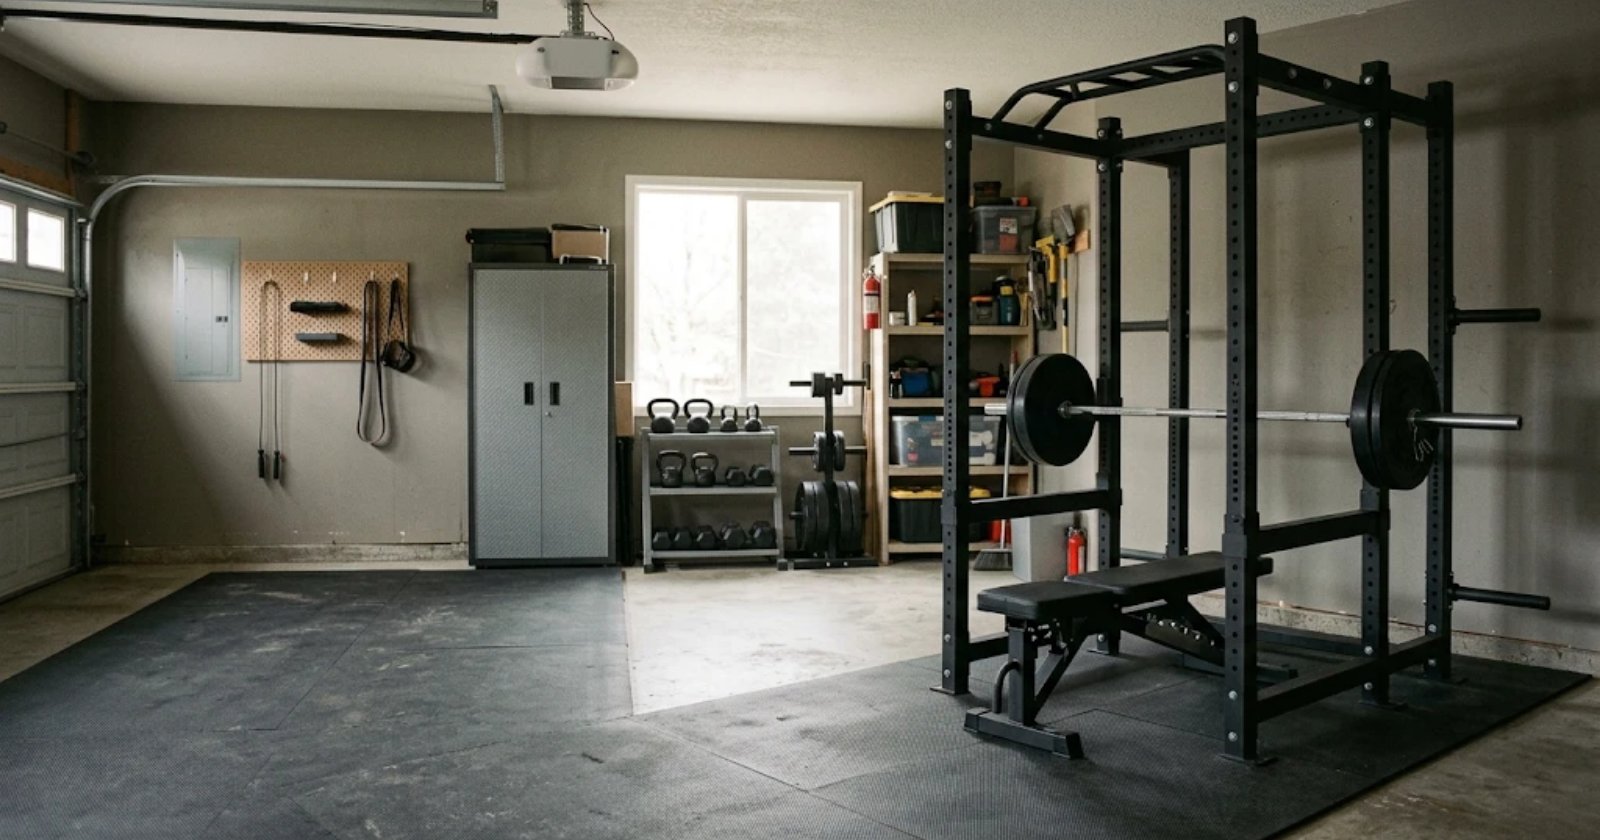
Illustration. The bench has to roll in, clear the rear of the rack and put your eyes under the bar. Plenty of good pairs fail one of the three.
A strong squat rack and a highly rated adjustable bench do not automatically make a good squat rack and bench combination. I found that out by rolling several benches into several racks and pressing in each pairing.
Some benches were too long to position correctly. Others had wide rear stabilizers that hit the rack’s lower crossmember. A few fit perfectly for flat benching and turned awkward the moment the back pad went up. Even when the bench physically fit, its pad height, wheel placement and adjustment ladder could make unracking much harder than the spec sheets suggested.
The problem was rarely the rack or the bench on its own. It was the pairing. A rack and bench are the backbone of most garage gyms, and nearly every pressing swap in the free Machine Swap Playbook assumes you have both working together.
I paired racks from REP Fitness, Rogue Fitness and Titan Fitness, plus a wall-mounted folding rack and an all-in-one cable rack, with adjustable benches from those makers and a couple of cheaper brands. I used each setup for flat bench presses, incline presses, seated shoulder presses, pin presses and dumbbell work. I measured the rack depth, the inside width, the bench length, the pad height, the rear-foot width, the wheel position and the distance from my head to the rear crossmember.
The short version: the REP PR-1100 with a compact REP adjustable bench was the easiest squat rack and bench pairing to live with. Rogue’s Monster Lite felt the most solid but needed more fiddling, and a Titan rack with a compact bench was the budget pick. Folding racks and all-in-one racks each need a particular kind of bench.
Why Squat Rack and Bench Compatibility Matters
Most people choose a rack on steel size, weight capacity, hole spacing and attachments, and a bench on pad width, adjustment angles, capacity and comfort. Those specs matter, but none of them tells you how the two products interact.
A bench has to move through the rack without hitting rear crossmembers, lower braces, plate-storage pegs, band pegs, spotter arms, wall brackets or, on an all-in-one rack, the cable system and weight stack. Then it has to put you at the right distance from the bar.
A bench can sit inside the rack and still place you too far forward or back. That gives you an awkward unrack, extra shoulder travel, or a bar that clips the uprights on the way out. Incline pressing makes it harder again. Raising the back pad brings your head forward on the bench, so the whole bench has to slide back toward the rear of the rack to get your eyes under the bar.
How I Tested Each Squat Rack and Bench Pairing
For every rack I measured the inside lifting depth, the inside width, the rear crossmember height, where the lower braces sat, the distance from the rear uprights to the bar, the J-cup depth, the hole spacing and the free space behind the bench.
For every bench I measured the total length, the pad height, the back-pad and seat lengths, the front and rear foot widths, the wheel and handle positions, and the bench’s length at each incline setting. I also marked my preferred flat and incline positions on the floor with tape, which showed whether a bench went back to the same spot every session.
Then I lifted in each squat rack and bench pairing for flat, incline and seated pressing, and checked stability before any real weight went on: pressing down on both sides of the back pad, the front and rear of the seat, each corner of the frame, the adjustment ladder, and the wheels and feet. A little pad movement is normal on an adjustable bench. Movement that shifted the bench on the floor was not. Empty-bar presses came next, so I could see whether leg drive made the bench slide before the load went up.
Rubber flooring improved nearly every pairing. On bare concrete some bench feet crept, especially with dust on the floor.
Five Tests a Squat Rack and Bench Pairing Has to Pass
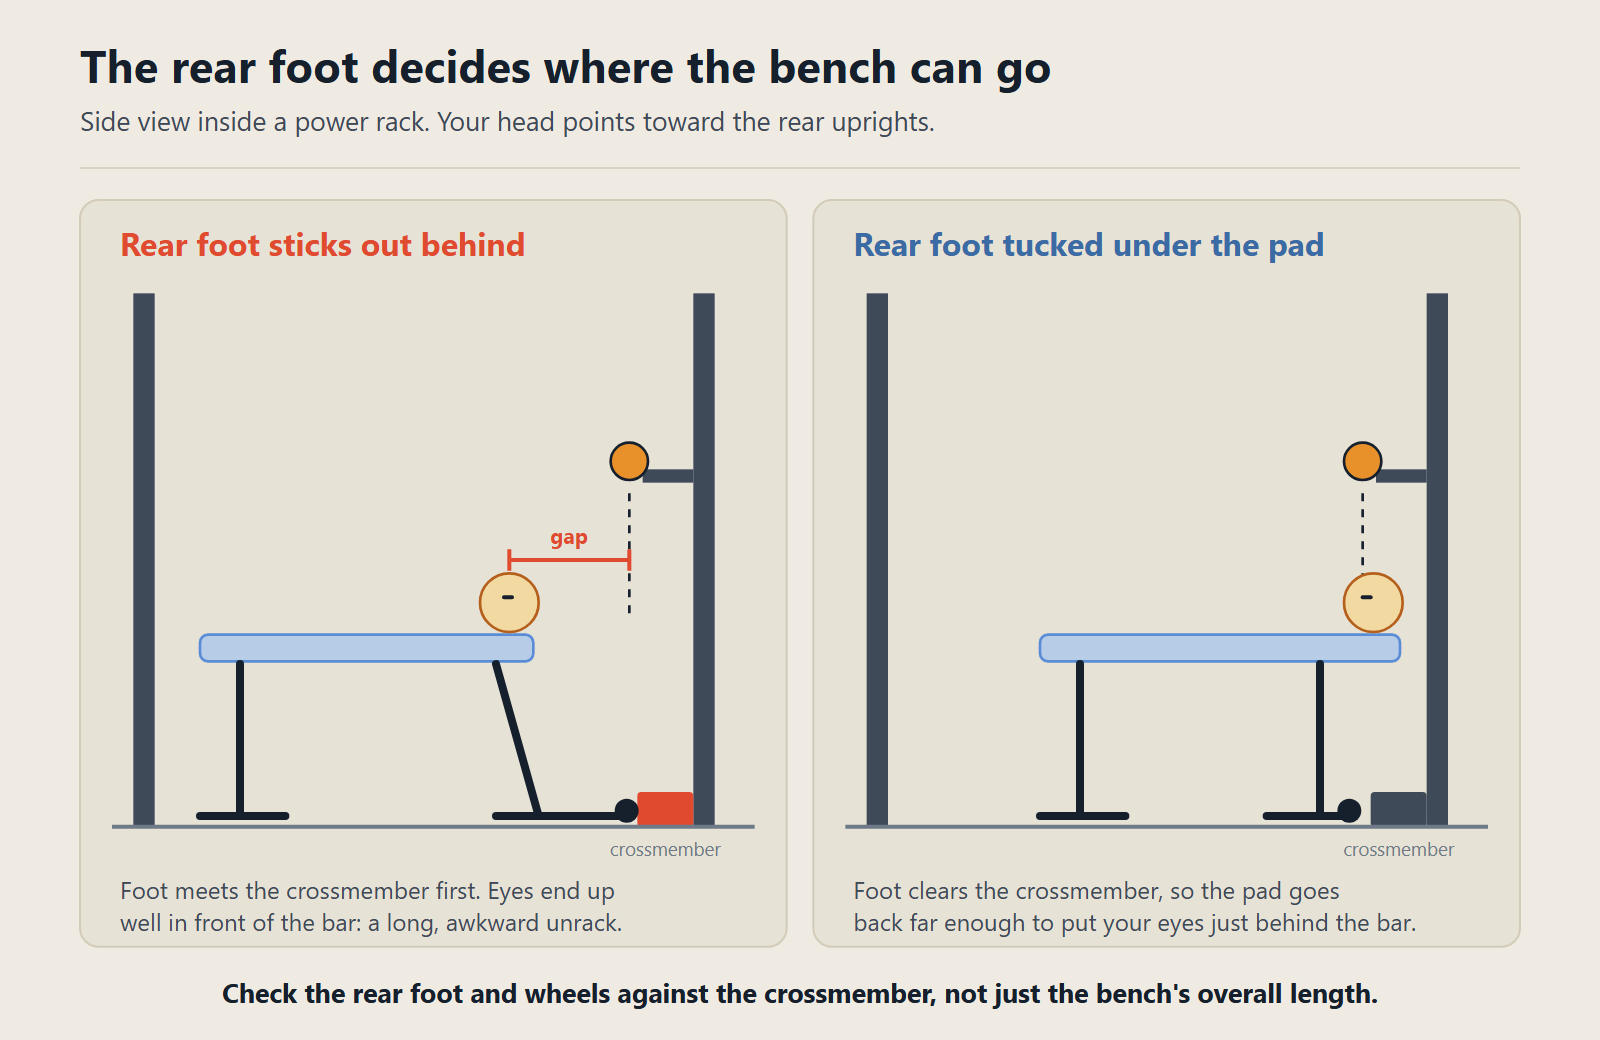
Figure 1. The rear foot, not the pad, decides how far back the bench can go.
The bench has to roll in easily
I did not want to lift or twist a heavy adjustable bench every time I trained. It had to roll straight into position without catching on anything.
The rear foot can’t hit the crossmember
This was the most common failure. A wide rear stabilizer makes a bench more stable on its own, and it can also stop the bench before the pad reaches the right place under the bar.
The pad height has to suit the J-cup holes
A tall bench changes where you sit relative to the bar. On a rack with wide hole spacing, one setting can feel too low and the next too high.
There has to be incline clearance
Flat compatibility does not guarantee incline compatibility. At higher angles the bench has to sit further back to keep your eyes under the bar, which brings the raised pad and the rear frame toward the rear uprights.
The whole setup has to stay put
Neither the bench nor the rack can shift during leg drive, the unrack or the rerack.
Best Overall Squat Rack and Bench: REP PR-1100 With a Compact REP Bench
The easiest combination I tested was REP’s PR-1100 four-post power rack with one of REP’s compact adjustable benches. The reason was not that both came from the same company. The bench’s frame, wheels, rear foot and total length simply worked inside the rack’s dimensions. REP lists the PR-1100 at 85 inches tall, 48.5 inches deep and 58.1 inches wide, rated to 700 lb.
Flat bench positioning
The bench rolled in without being turned sideways. Its rear stabilizer cleared the rack’s lower structure, so the pad could go far enough back for a comfortable unrack, and once in place it stayed put under leg drive. I could set my eyes just behind the bar without the bench pushing into a crossmember. That sounds basic, and several other combinations failed exactly here.
Incline pressing
The pairing kept working at moderate inclines. As the back pad rose, I could slide the bench forward or back far enough to keep my head clear of the bar and the rear uprights. At very steep settings the space got tight, but it stayed usable, and the rack’s depth let me adjust without moving the bench outside the safeties.
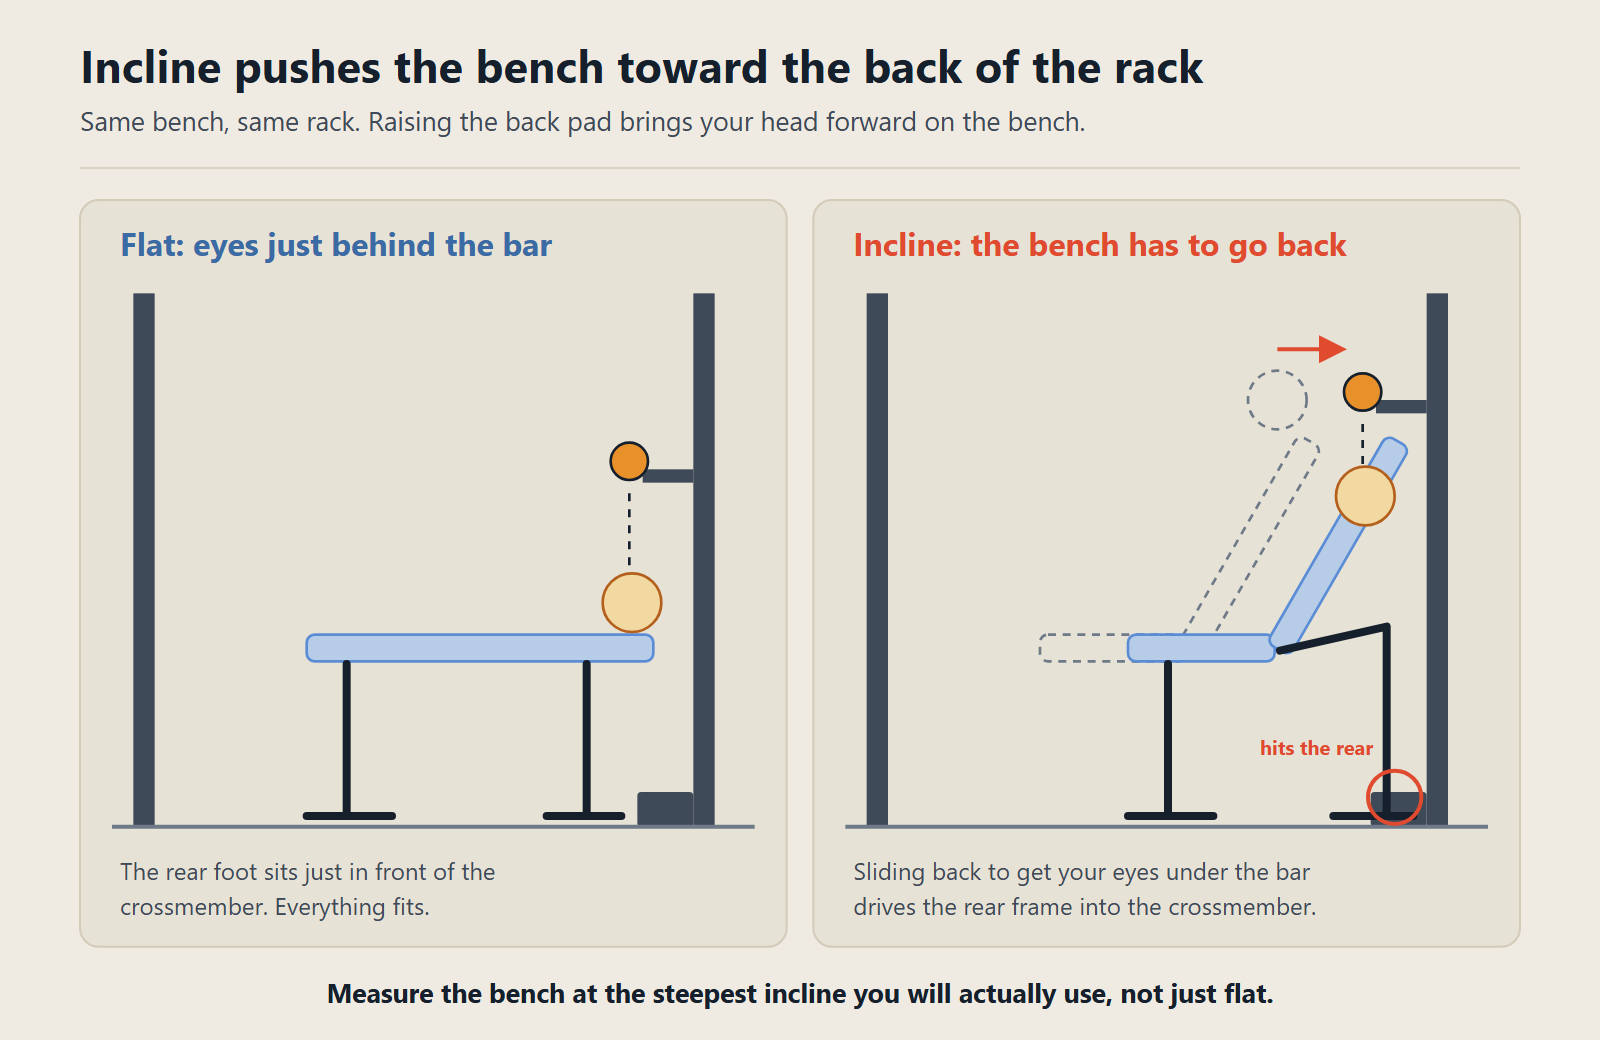
Figure 2. Raising the back pad brings your head forward, so the bench has to go back. That’s why incline exposes pairings that look fine flat.
Hole spacing is the PR-1100’s compromise
The PR-1100 is drilled at 3-inch spacing all the way up, with no tighter Westside zone through the bench area. That is coarser than Rogue’s Monster Lite and Titan’s T-3 racks, which both use 1-inch spacing there. With this bench’s pad height I could still find a J-cup setting for a controlled unrack, without the partial triceps extension that a too-high hook forces. If your arm length happens to land between two holes, though, you will notice those 3 inches more than I did. When in doubt, take the lower hole, because a slightly low unrack is safer than a slightly high one.
What I didn’t like
The bench is heavy, so moving it across a rough garage floor took more effort than rolling it on smooth rubber, and its pad took a few sessions to get used to. Those are traits of the bench rather than compatibility problems.
Why it won
This squat rack and bench pairing caused the fewest interruptions. I could roll the bench in, line it up, set the J-cups and start training without rearranging half the rack, and it worked for flat pressing, incline pressing, seated shoulder work and dumbbell exercises. If dumbbells are part of your plan, I compared the heavy end of that market in 100 lb adjustable dumbbells.
Best Premium Pairing: Rogue Monster Lite With a Heavy Adjustable Bench
The Rogue combination felt extremely solid. The rack hardware, J-cups, uprights and bench construction all inspired confidence under heavier presses. It also asked more of me when positioning it.
Flat, it was excellent once aligned. The bench did not shift under leg drive, the rack stayed planted during the unrack, and the pad gave strong upper-back support on a frame built for more weight than I can press.
The rear stabilizer was the challenge. Depending on how the rack was configured, the bench’s rear foot could reach a lower rear crossmember before the pad reached my ideal spot. Moving the J-cups to the other side of the uprights helped in some setups, and removing or relocating rear storage helped more. The same bench that worked in a deeper rack became harder to position in a shallow one, which shows how much configuration matters compared with brand.
Incline worked at moderate angles. Steeper settings meant pulling the bench forward, which left less of it inside the rack. For those, spotter arms sometimes worked better than the internal safeties.
This was the strongest-feeling pairing but not the easiest. It suits someone who puts construction first and doesn’t mind spending time on the layout.
Best Budget Pairing: Titan Rack With a Compact Adjustable Bench
The Titan combination delivered useful performance for considerably less money. It didn’t feel as refined as the REP or Rogue pairings, but it handled ordinary garage training.
What worked. The compact bench rolled in easily. Its narrower rear foot cleared the lower crossmember, and its lighter frame made repositioning quick. Flat bench pressing was straightforward, and the pad was firm enough to support me. The rack stayed stable once anchored or weighted down.
Where the savings showed. The bench had more visible movement around its adjustment points. It never felt unsafe, but I noticed it when I shifted my shoulders or set up aggressively. Incline pressing exposed more of that movement: the back pad stayed usable, but the setup didn’t feel as planted as the premium pairings, and the bench had to be placed carefully so its rear frame didn’t touch the rack.
This pairing makes sense for beginners and intermediate lifters who want a complete setup without premium prices, and who will accept less refinement in return.
Get the whole system, not just the rack and bench
A rack and bench unlock most of the barbell work a commercial gym offers. The Machine Swap Playbook maps every common gym station to its movement pattern, gives three ranked swaps for each, and shows which ones a bench and rack make possible, with the load rules on a single printable page.
Eighteen swaps. Forty pages. Free, no upsell.
Best for Small Garages: A Folding Rack and an Upright-Storing Bench
A folding rack only saves space if the bench stores efficiently too. Leave a big adjustable bench in the middle of the floor and most of the benefit of folding the rack is gone.
For a small garage the best combination was a wall-mounted folding rack, a bench designed to stand upright for storage, a narrow rear stabilizer, and wheels that stayed reachable near the wall.
Training position. With the rack open, flat pressing worked normally. The limit was depth: shallow folding racks put the bar closer to the wall and leave less room for the bench’s rear frame, so a compact bench worked much better than a long commercial-style one.
Storage. After training I could roll the bench away, stand it upright and fold the rack to the wall, which gave back enough room to park a car. The bench has to be stable when stored on end. Not every adjustable bench is designed for it, and standing one up that isn’t can be unsafe or damage the padding.
The compromise. High-incline pressing was less comfortable, because the raised back pad put my head close to the wall and the upper rack brackets. For incline work I sometimes set the bench in front of the rack and used wall-mounted spotter arms. That works, but it isn’t the same protected space as pressing inside a full rack.
The All-in-One Rack Problem
All-in-one racks combine a barbell station with cables, a weight stack, pulleys and storage. They offer huge exercise variety, and the low pulley, guide rods, footplate or rear crossmember can occupy exactly the space the bench needs.
Flat pressing usually worked, because the bench stays low and straight. I sometimes had to sit it a little further forward than I liked, which moved my head away from the bar and made the unrack less natural.
Incline pressing was harder. As the back pad rose, the bench frame moved into the cable system, and some benches couldn’t go far enough back without touching pulleys or guide rods. A bench with a short rear frame did much better.
Cable work flips the priorities. The same bench might be excellent for cable rows, lat pulldowns and seated curls. The best bench for barbell pressing is not always the best bench for an all-in-one trainer.
Details That Make or Break a Squat Rack and Bench Pairing
Flat-foot racks and base rails
Flat-foot racks don’t need anchoring, which suits garages and rentals, but their base rails can get in the way of bench wheels and stabilizers. A bench with a wide rear foot may hit both rails before it reaches the right spot, and even a bench that fits between them may not roll over them smoothly. Three things helped: a bench with a narrower rear stabilizer, benching from the other side of the rack, or setting the bench between the rails where the design allows. Be careful with that last one. The bench needs full, stable floor contact, so never balance it on uneven rails or improvised blocks.
Bench length
A long bench gives excellent support, especially for taller lifters, and it can be a problem in a shallow rack, where the rear frame meets the crossmember while the front sticks out past the safety zone. A shorter bench was easier to place, though some compact models gave less head support on inclines. There’s no universal right length. What matters is where the bench’s feet and frame sit relative to the pad. Two benches of similar overall length behaved completely differently because their wheels and stabilizers sat in different places.
Pad height
Competition flat benches sit at a familiar standard height, while adjustable benches often run taller. A taller pad puts you closer to the bar, changes the right J-cup hole, and reduces the knee bend available for your feet. Taller lifters may not mind, but shorter lifters can struggle to keep their feet planted. On a rack with coarse hole spacing, a tall bench can also make the ideal unrack height harder to hit, so compare the bench’s pad height with the rack’s hole spacing before you buy.
Pad width
A wide pad gave my shoulders more support and also restricted my upper arms on some presses. In a narrow rack it left less room between my arms and the uprights. That barely mattered flat and became noticeable on inclines. Wide pads worked best in racks with generous inside width and good J-cup clearance.
The Ten Most Common Pairing Faults
The same problems came up across every combination:
| Pairing fault | What it does |
|---|---|
| Rear foot hits the crossmember | The bench can’t go back far enough |
| Bench too long for the rack | A poor unrack position |
| Bench too tall | An awkward J-cup height |
| Wide rear stabilizer | It catches on base rails |
| Badly placed wheels | Hard to roll into the rack |
| Incline pad meets the uprights | Limits incline use |
| Storage attachments in the way | Fewer places to put the bench |
| Cable system behind the bench | The bench sits too far forward |
| Wide pad in a narrow rack | Less room for your arms |
| Shallow rack depth | Less safety coverage |
None of these means a product is bad. They mean the combination needs more planning.
The Best Squat Rack and Bench Pairing for How You Train
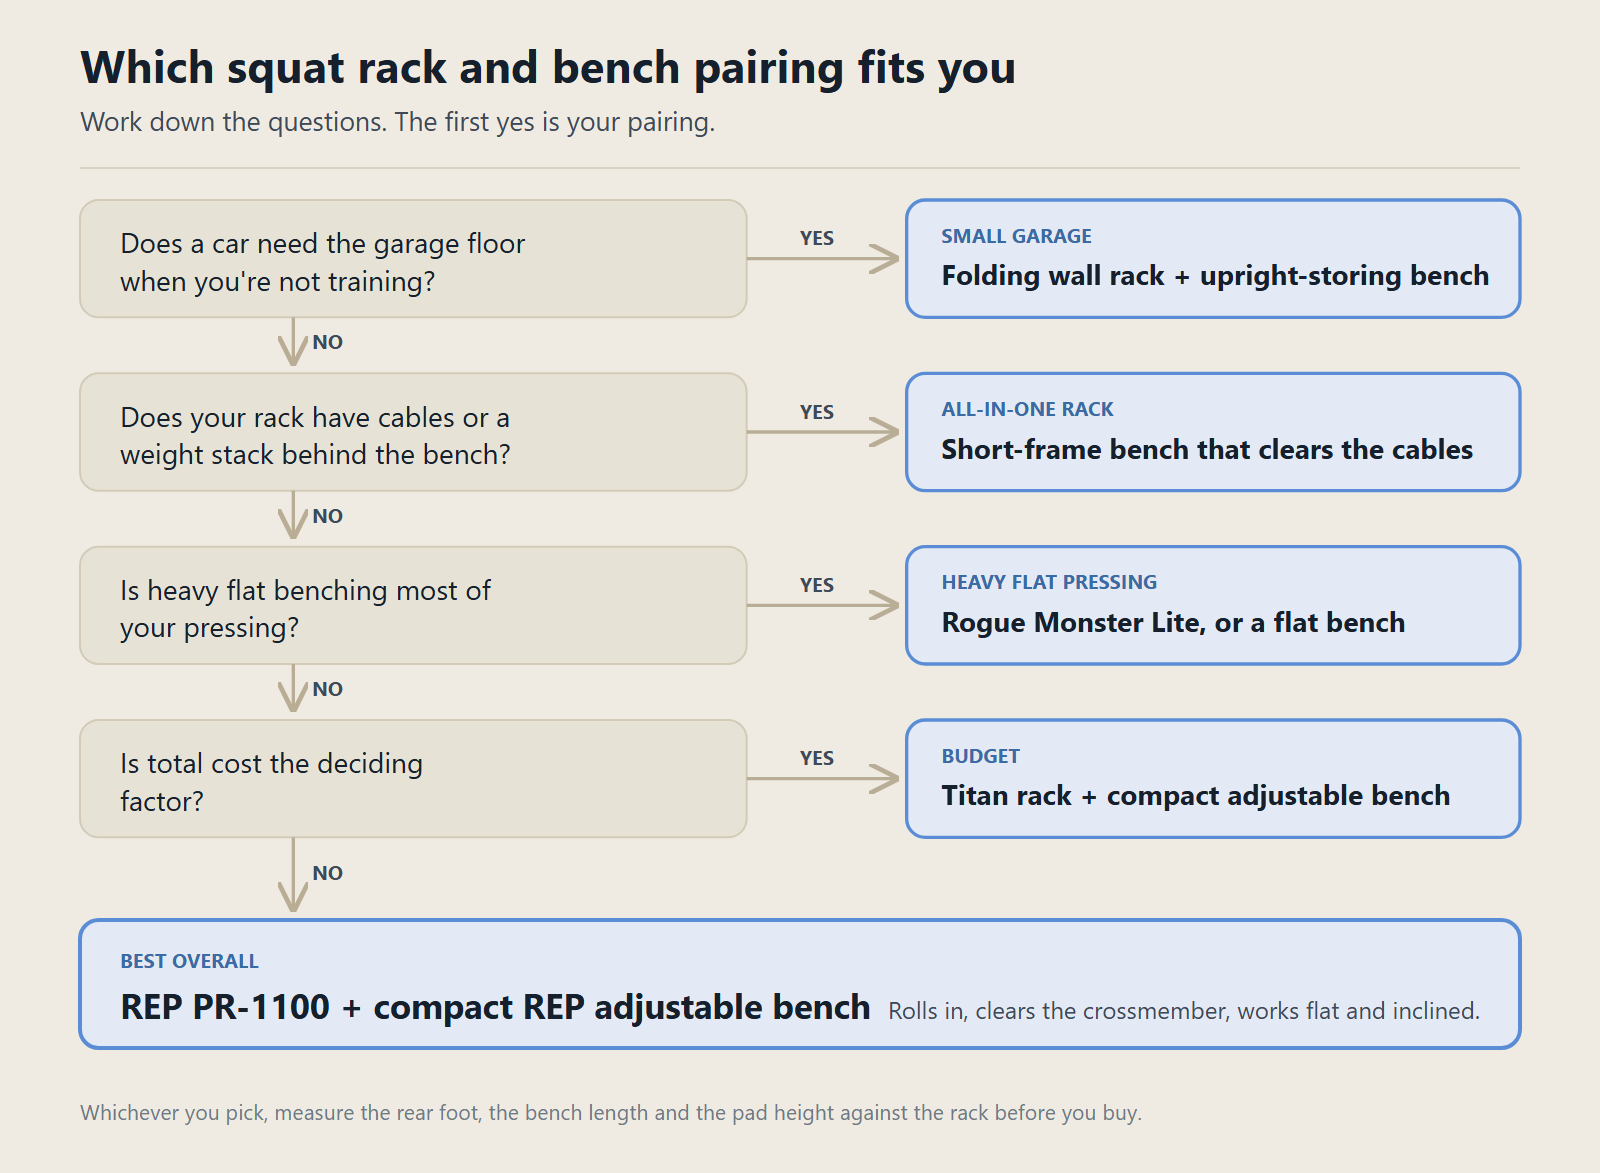
Figure 3. Work down the questions. The first yes is your pairing.
- Best overall: the REP PR-1100 with a compact REP adjustable bench, the most balanced setup.
- Heavy flat benching: the Rogue Monster Lite rack with a premium bench, the most rigid pressing station once it’s positioned.
- Budget: a Titan rack with a compact adjustable bench, functional at a lower total cost.
- Small garages: a folding wall rack with a bench built for upright storage, which reclaims the most floor.
- Cable training: an all-in-one rack with a short-frame bench that clears the pulleys and weight stack.
- Competition-style benching: a dedicated flat bench, which is lower, simpler and easier to place than most adjustables.
What You Need to Buy
A rack, a bench that fits it, and rubber flooring under both. The flooring improved stability in every pairing I tried.
The rack: REP PR-1100 Power Rack
The rack from my best-overall pairing. It’s a four-post cage rated to 700 lb, 85 inches tall, so check your ceiling height before you order.
Check the REP PR-1100 on Amazon
The bench: REP Nighthawk Adjustable Bench
For a compact REP bench to go inside it, my pick is the REP Nighthawk Adjustable Bench: flat, incline and decline in one frame, 51 inches long with a 16.7-inch pad height, and it folds away when you need the floor back.
Check the REP Nighthawk on Amazon
The alternatives
For the premium pairing, Rogue sells its Monster Lite racks direct. For the budget pairing, Titan’s power racks cover several depths and heights. Whichever you choose, run the checks below with the exact bench you plan to use.
Five Things to Check Before You Buy a Squat Rack and Bench
Product photos won’t tell you whether a pairing works. Measure these first.
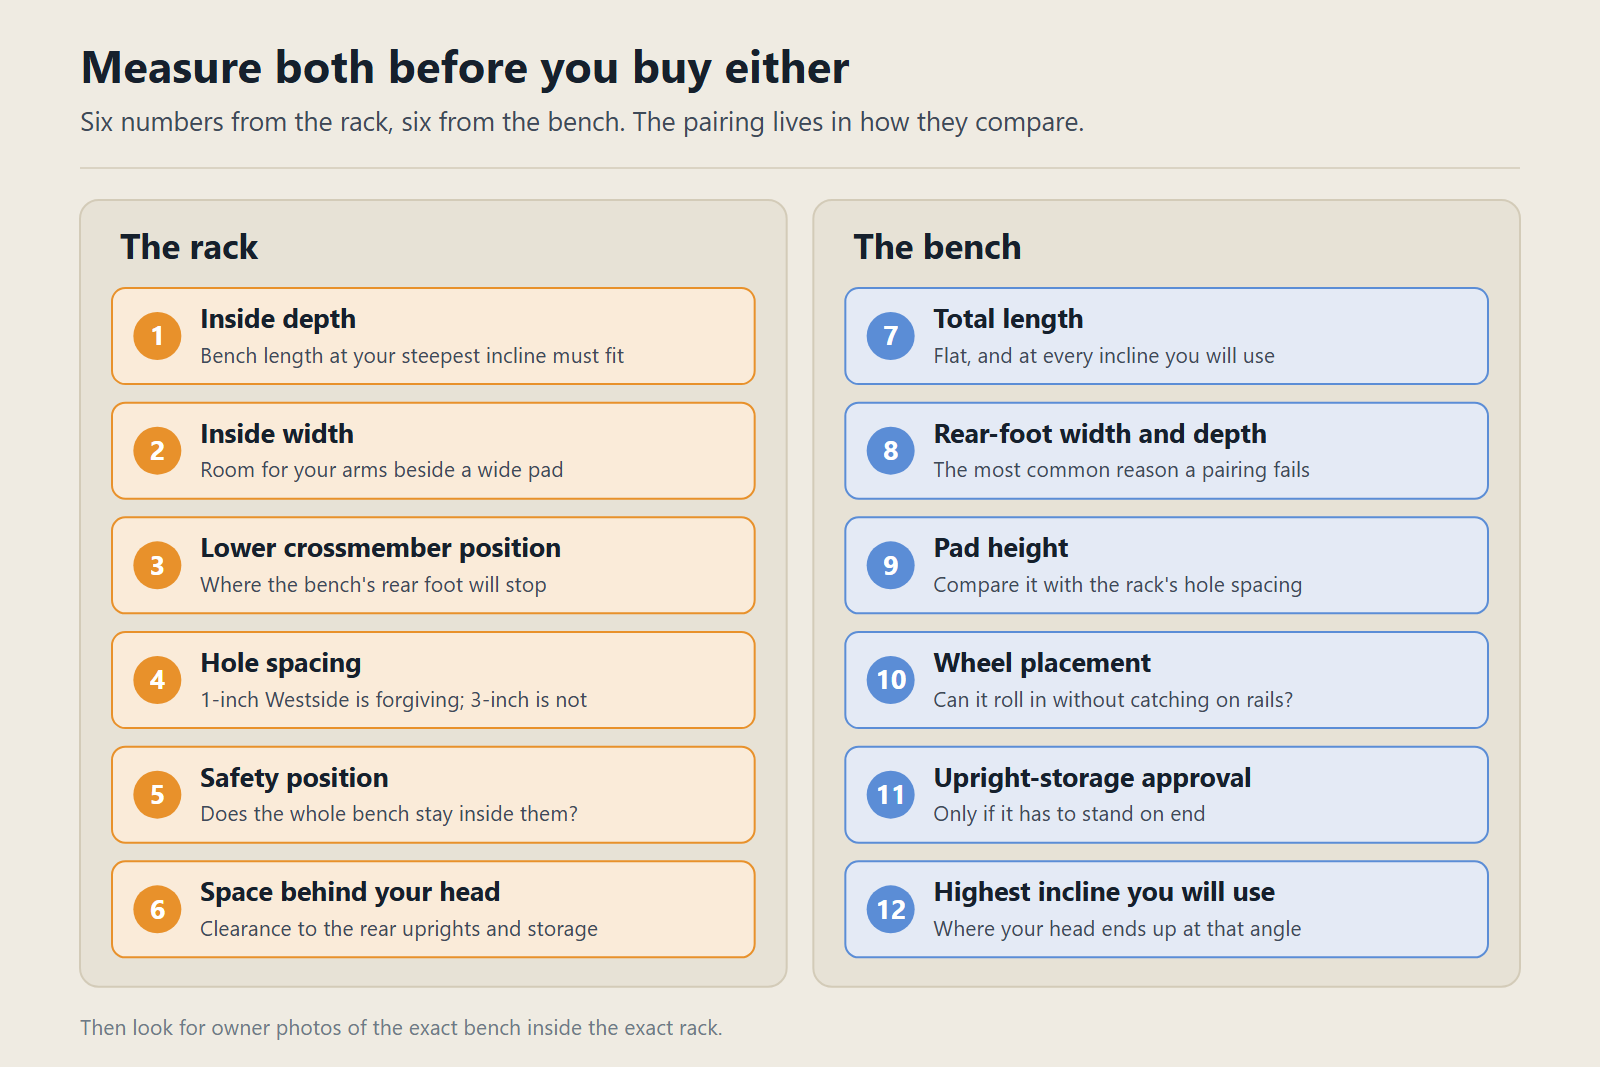
Figure 4. Six numbers from the rack, six from the bench. Compare them before you buy either.
- Rear-foot width against the rack’s lower crossmember. This is the most common reason a bench won’t sit far enough back, so check where the crossmember sits and how wide the bench’s rear foot is.
- Bench length against rack depth. The bench has to fit with the pad under the bar and the seat still inside the safeties.
- Pad height against hole spacing. A tall pad on a rack with 3-inch spacing may leave no hole at the right unrack height. Racks with 1-inch Westside spacing through the bench zone are more forgiving.
- Your highest incline. At an incline the bench has to sit further back to keep your eyes under the bar. Check that it can, at the steepest angle you’ll actually use, without its rear frame meeting the uprights or crossmember.
- Storage. If the bench has to stand on end, confirm the maker approves upright storage, and that the folded rack and the stored bench fit together.
Look for owner photos of the exact bench inside the exact rack. A maker’s compatibility statement is useful, but real setups show how much working room is left.
Free Tools for Setting Up a Home Gym
- Machine Swap Finder: type any gym machine and get three ranked swaps, with a gear line showing which ones need a bench or a rack.
- Loadable Weight Rounder: see what your plate jumps mean in practice, and which load to use when your target falls between two.
Questions People Ask About Squat Rack and Bench Combos
Will any adjustable bench fit inside a squat rack?
No. A bench has to clear the rack’s lower rear crossmember, base rails and any storage pegs, and still put your eyes just behind the bar. A wide rear foot is the most common reason a good bench won’t sit far enough back in a good rack.
What is the best squat rack and bench combination?
In my testing, the REP PR-1100 power rack with a compact REP adjustable bench. It rolled in without fuss, cleared the lower crossmember, stayed stable under leg drive and worked flat and inclined. Its 3-inch hole spacing is its main compromise.
How deep should a power rack be for bench pressing?
Deep enough that the bench pad sits under the bar with the seat still inside the safeties. Measure the bench’s length at your steepest incline, because that’s when it needs the most room.
Why does my bench hit the back of my squat rack?
Usually the rear stabilizer meets the lower rear crossmember before the pad reaches the right spot. Try moving the J-cups to the other side of the uprights, clearing rear storage, benching from the other side of the rack, or choosing a bench with a narrower rear foot.
Does bench pad height matter in a rack?
Yes. A taller pad brings you closer to the bar, changes which J-cup hole works and leaves less knee bend for your feet. On a rack with coarse hole spacing, it can leave no hole at the right unrack height.
Can you incline bench inside a squat rack?
Usually at moderate angles. Raising the back pad brings your head forward, so the bench has to slide back to get your eyes under the bar, and at steep angles its rear frame can meet the rear uprights or crossmember. If it won’t fit, set the bench further forward and use spotter arms instead of the internal safeties.
Do I need a flat bench or an adjustable bench for my rack?
For heavy, competition-style benching, a dedicated flat bench is lower, simpler and easier to place. For incline pressing, seated shoulder work and dumbbell exercises, an adjustable bench that fits your rack is more useful.
The Verdict on Squat Rack and Bench Combos
The best squat rack and bench combination was not the one with the biggest capacity numbers. It was the setup that let the bench roll into position without hitting the rack, gave a comfortable unrack height, stayed stable under leg drive and worked at more than one back-pad angle.
The REP PR-1100 with a compact REP bench did that with the fewest compromises, and its coarse hole spacing is the one to check against your own setup. Rogue’s Monster Lite felt more premium but needed more careful placement. The Titan pairing was the best value, with more frame movement in return. Folding racks want compact benches built to store upright, and all-in-one racks want short-frame benches that stay clear of the cables.
The best pairing is the one that disappears while you train: the bench rolls into place, the bar sits at a natural height, and the rack protects the lift without getting in its way. When those details line up, two pieces of equipment become one station.
A rack and bench are the start. The Machine Swap Playbook covers eighteen swaps across the six patterns the gym’s queues form around, with a one-page cheat sheet you can screenshot and use mid-workout.
→ Send me the playbook — it’s free
Affiliate disclosure: WildnSwole earns a commission when you click a link to a partner and make a purchase. As an Amazon Associate, I earn from qualifying purchases. Commissions do not change what the content recommends and they do not add to what you pay.
The content in this article is for general information only and does not constitute medical or personal training advice. Always consult a qualified professional before making changes to your training.
Leave a Reply